 Pin it
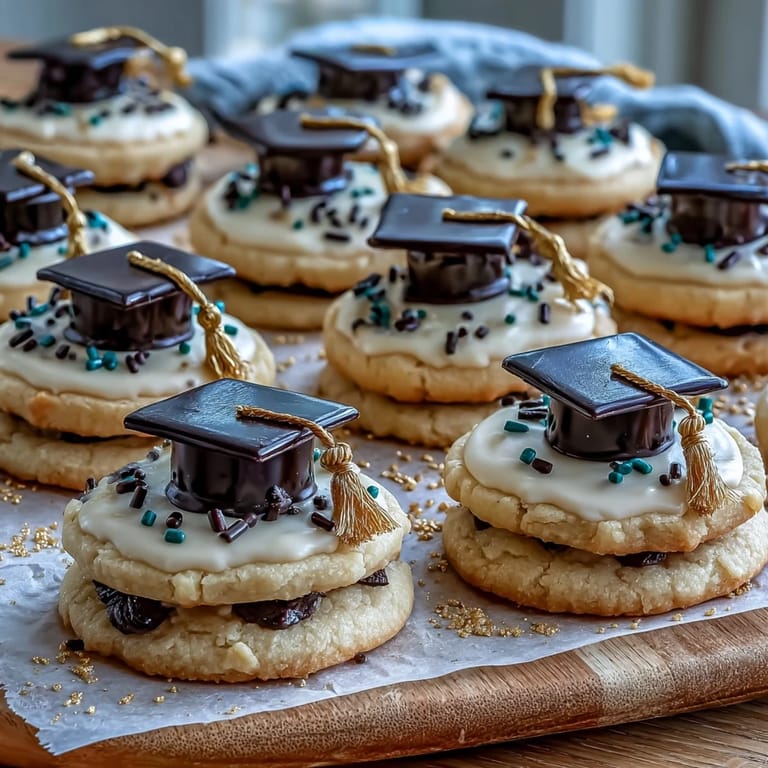
 The entire apartment smelled like sweet triumph the first time I baked these graduation cookies. I had classical music playing in the background, hands dusted with flour, tracing out little caps and rolled diplomas. My neighbor peeked in, lured by the buttery aroma, and only commented that the gold decorations seemed impossibly fancy. There’s something quietly joyful about crafting edible accolades, even if your icing lines land a little wobbly. It makes the finished cookies as much about celebration as about creativity.
I’ll never forget the stack of cookies I brought to my cousin’s kitchen table, late at night after her graduation. We laughed about who had the steadiest hand for gold tassel painting, sneaking bites between decorating, until a gentle hush settled over the room and the sheer accomplishment (and sugar) hit us both at once.
Ingredients
- All-purpose flour: Go for the plain kind; careful measuring prevents dry, tough cookies.
- Unsalted butter, room temperature: Soft, not melted butter gives a delicate crumb—I always leave it out for an hour ahead.
- Granulated sugar: Cream this well with the butter for a smooth, light base.
- Large egg: Adds structure, and make sure it’s room temperature for best mixing—trust me.
- Pure vanilla extract: Use the real thing; the aroma lifts the whole kitchen.
- Almond extract (optional): Just half a teaspoon goes a long way, or swap for lemon for a different celebration vibe.
- Salt: Just enough to balance all that sweetness.
- Powdered sugar, sifted: Clump-free icing is key to smooth decorating—don’t skip the sifting.
- Egg whites (or meringue powder + water): Both work for royal icing; I switch based on what’s easy that day.
- Cream of tartar: This makes the icing sturdy enough for sharp pipework.
- Vanilla extract: Just a splash rounds out the royal icing flavor.
- Black gel food coloring: Intense and doesn’t thin your icing—I’ve learned regular dye just doesn’t pop.
- Gold edible luster dust + clear alcohol or lemon extract: Brush this on at the end for true wow factor; use a fine, food-safe brush.
Tired of Takeout? 🥡
Get 10 meals you can make faster than delivery arrives. Seriously.
One email. No spam. Unsubscribe anytime.
Instructions
- Cream the Butter and Sugar:
- Beat the butter and sugar together until pale and fluffy—the kitchen will feel toastier instantly.
- Add Eggs and Flavorings:
- Crack in the egg, add both extracts, and beat until fully mixed, watching how it smooths out and fluffs up.
- Mix In Dry Ingredients:
- Sift your flour and salt right into the bowl, then stir gently until the dough just comes together without overmixing it.
- Chill the Dough:
- Halve the dough, shape into discs, and wrap in plastic wrap—let it chill for at least 45 minutes or until firm to touch when pressed.
- Roll and Cut:
- Flour your counter and roll dough to 1/4 inch; cutting out diploma and cap shapes is strangely satisfying, even if scraps build up.
- Bake the Cookies:
- Transfer shapes to parchment-lined trays and bake at 350°F (175°C) for 8 to 10 minutes, just until the edges get that hint of golden brown.
- Cool Completely:
- Lift the cookies to a wire rack—wait until they’re cool before touching or decorating, or they’ll break.
- Prepare Royal Icing:
- Beat egg whites until frothy, then add powdered sugar and cream of tartar; keep beating until it forms glossy peaks that don’t drip off the beater.
- Tint and Portion Icing:
- Divide the icing: tint some black for caps, leave some white for diplomas, and set aside a small batch for gold painting.
- Decorate the Cookies:
- Pipe outlines before flooding, then add details like ribbons or cap buttons—there’s joy in watching the icing settle perfectly smooth.
- Paint Gold Accents:
- Mix gold luster with a few drops of clear alcohol and paint on ribbons or tassels with a thin brush; it dries fast and feels instantly fancy.
- Let Set and Enjoy:
- Let all icing and accents dry completely before stacking or serving, so every detail stays sharp and shiny.
 Pin it
 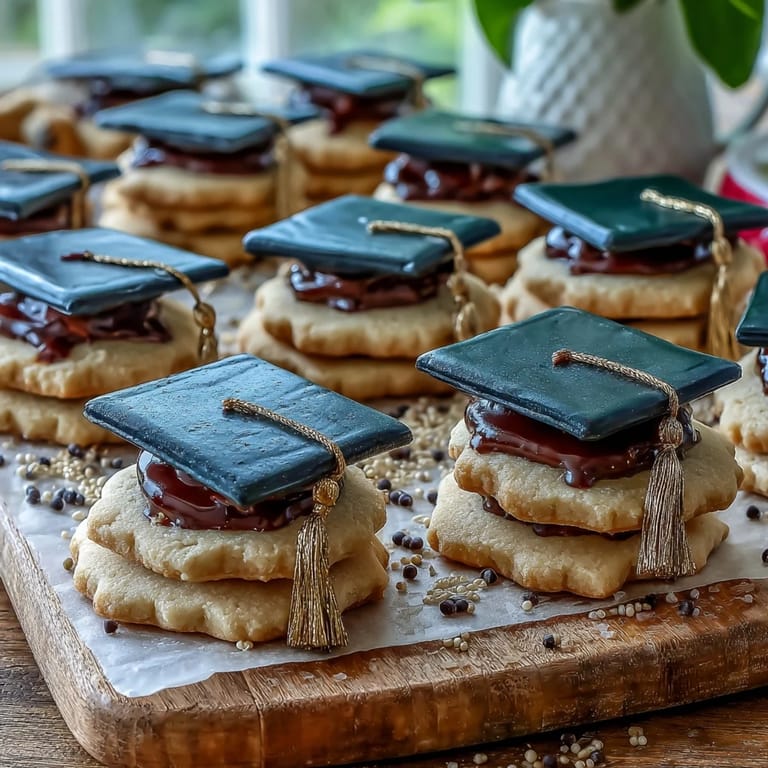 Pin it
 At my friend’s backyard graduation party, one grandparent kept sidling up for ‘just one more cap cookie’; it was clear these treats became part of everyone’s memory, not just the photos in caps and gowns.
Tools That Make All the Difference
A stand mixer saves my arms when creaming that cold butter, while icing bags with fine-tipped nozzles transformed my wobbly beginner lines into genuine cookie art. Using food-safe brushes for the gold detail became its own little ritual, like putting a finishing flourish on a masterpiece.
Easy Ways to Personalize Your Cookies
Swapping almond extract for lemon gives the cookies a citrusy lift, and I sometimes use navy or school colors instead of the standard black. Once, a guest piped each diploma with initials, turning the batch into edible name tags—there’s plenty of room to let your imagination loose.
Storage, Gifting & Make-Ahead Tips
If you stash the finished cookies in an airtight tin between layers of parchment paper, they keep beautiful texture for a week.
- Let cookies dry overnight before packing them up.
- Add extra padding if you’re mailing them for a long-distance “congratulations.”
- Remember to keep them out of humid spots so the royal icing stays crisp.
 Pin it
  Pin it
 Celebrate achievements big and small with these joyful cookies—each golden detail is like a little cheer on the plate, and the happy memories baked in go far beyond any diploma.
Recipe FAQs
- → How do I keep the cookies from spreading?
Chill the dough thoroughly before rolling and again on the sheet pan if needed. Use a 1/4-inch thickness, avoid overworking the dough, and make sure butter is not too soft at mixing.
- → What consistency should the royal icing be for flooding?
For flooding, thin royal icing to a ribbon-like consistency that levels out in about 10–15 seconds when dribbled from a spoon. Keep a stiffer icing on hand for outlines and details.
- → Can I substitute meringue powder for egg whites?
Yes. Use the equivalent meringue powder and water ratio (about 4 tbsp powder + 6 tbsp water for 2 egg whites) to ensure stable, food-safe royal icing that dries glossy and firm.
- → How do I apply the edible gold without smudging the icing?
Allow royal icing to dry completely (at least 1 hour, longer for thicker layers). Mix gold luster dust with a few drops of clear alcohol or lemon extract, then use a fine, food-safe brush to gently paint accents.
- → How long do the decorated cookies keep?
Store in an airtight container at room temperature for up to 1 week. Place parchment between layers to protect decorations; avoid humid environments to prevent the icing from softening.
- → Any tips for sharp edges on cap and diploma shapes?
Chill cut cookies on the baking sheet for 10–15 minutes before baking to help retain shape, and use a firm, even roll with minimal flour on the surface to preserve crisp edges.