 Pin it
 The idea came from a potluck where everyone brought the same boring chips and dip. I wanted something that looked dramatic but didn't require culinary school training. I folded tortillas into little triangles, arranged them in a circle like petals, and prayed they wouldn't fall apart in the oven. When I pulled out that golden, cheesy ring, even I was impressed. It's been my secret weapon ever since.
I made this for a game night once, and my friend swore I'd ordered it from a restaurant. She kept asking which caterer I used. When I told her it was just folded tortillas and cheese, she accused me of lying. Now she makes it for every birthday party and texts me photos like she invented it herself.
Ingredients
- Small flour tortillas: The 5 to 6 inch size is crucial because bigger ones create floppy triangles that won't hold their shape in the ring, and I learned that the messy way.
- Shredded cheddar cheese: Sharp cheddar adds tangy depth, but mild works if you're feeding picky eaters who think seasoning is controversial.
- Shredded Monterey Jack cheese: This is your melt insurance policy because it gets gooey and stretchy in ways that make the whole ring hold together.
- Cooked black beans: Drain them well or you'll end up with soggy tortillas, a mistake I only made once before learning my lesson.
- Red bell pepper: Dice it small so it distributes evenly and adds little pops of sweetness and crunch in every bite.
- Green onion: The mild bite cuts through all that cheese without overpowering the other flavors.
- Ground cumin: Just enough to whisper warmth without making anyone ask what that flavor is.
- Chili powder: Adds color and a gentle kick that even spice-averse friends can handle.
- Smoked paprika: This is what makes people think you did something fancy when really you just shook a jar.
- Unsalted butter: Melted and brushed on top, it turns the tortillas golden and gives them that bakery-level shine.
- Fresh cilantro: Brightens the whole thing up and makes it look like you know what garnishing means.
- Prepared salsa: Store-bought is completely fine and saves you from dicing tomatoes when you're already folding 32 triangles.
- Sour cream: Cooling contrast for anyone who went heavy-handed with the chili powder.
Tired of Takeout? 🥡
Get 10 meals you can make faster than delivery arrives. Seriously.
One email. No spam. Unsubscribe anytime.
Instructions
- Get the oven ready:
- Preheat to 400°F and line your baking sheet with parchment because nothing ruins the mood like scraping burnt cheese off a pan later. Trust me on this.
- Mix the filling:
- Toss both cheeses, black beans, bell pepper, green onion, and all the spices in a big bowl until everything looks evenly coated. Season with salt and pepper to taste, remembering the cheese is already salty.
- Cut the tortillas:
- Slice each tortilla straight down the middle to make semicircles. You'll end up with 32 pieces, which sounds like a lot until you realize how fast they disappear.
- Fill and fold:
- Spoon about a tablespoon of filling onto each semicircle, then fold the straight edge over to form a triangle. Press the edges gently so they stick but don't squeeze the filling out the sides.
- Arrange the ring:
- Lay the triangles on your baking sheet with points facing inward, overlapping slightly like flower petals in a tight circle. This part feels a little fussy but it's worth it for the wow factor.
- Brush with butter:
- Use a pastry brush to coat the tops with melted butter, making sure you get into the creases. This is what gives you that golden, crispy finish.
- Bake until golden:
- Slide the pan into the oven and bake for 18 to 20 minutes, watching for the edges to turn crisp and the cheese to bubble. Your kitchen will smell incredible.
- Garnish and serve:
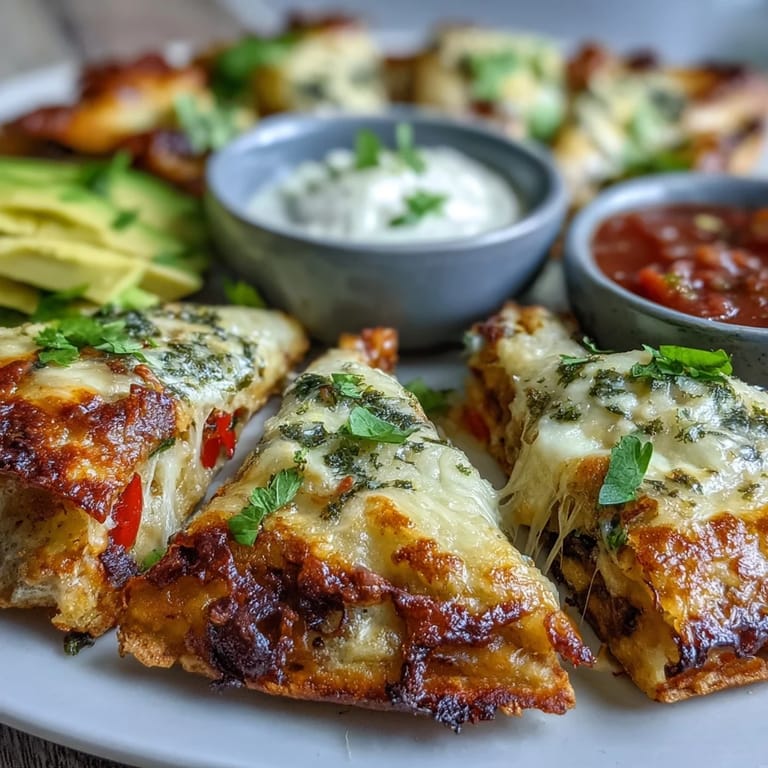
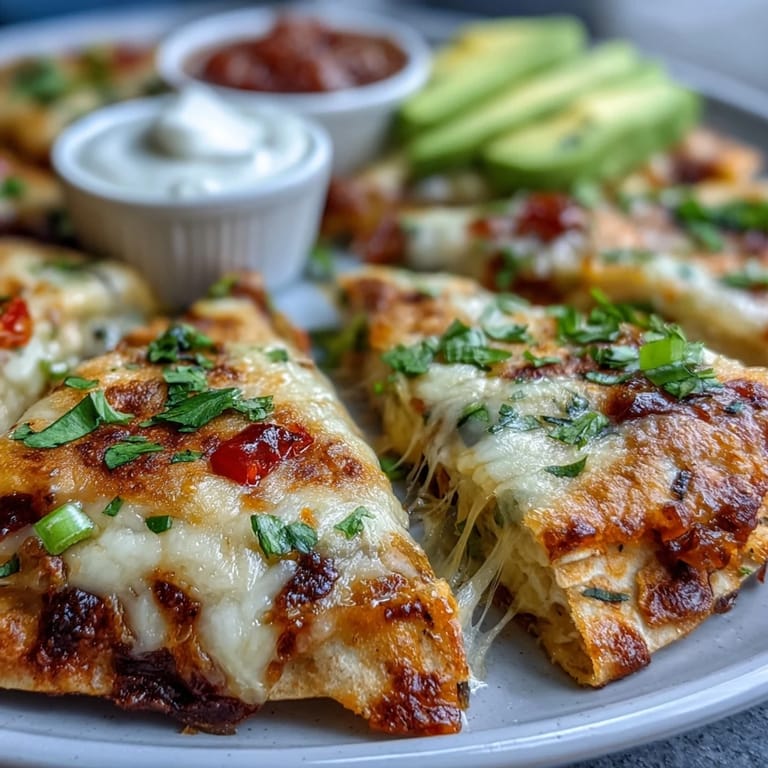
- Transfer the ring to a platter, sprinkle cilantro over the top, and nestle bowls of salsa, sour cream, and avocado in the center. Add lime wedges if you're feeling fancy.
 Pin it
 My neighbor saw this cooling on my counter once and asked if I was having a party. I wasn't, but I invited her over anyway because it felt wrong to eat the whole thing alone. We sat on the porch with lime wedges and salsa, pulling apart the ring piece by piece until it was gone. Sometimes the best gatherings are the ones you don't plan.
Making It Your Own
I've tucked shredded rotisserie chicken into the filling when I needed more protein, and once I added crumbled chorizo that turned the whole thing smoky and rich. A friend who doesn't eat meat swapped in sautéed mushrooms and corn, and honestly, I liked hers better than my original. The structure works with almost anything as long as you keep the filling thick enough to stay put.
Timing and Temperature
I used to bake this at 375°F thinking lower and slower was safer, but the tortillas never crisped up right. Bumping it to 400°F was the game changer because the outside gets golden while the cheese inside melts perfectly. If your oven runs hot, check it at 16 minutes because burnt edges happen fast and there's no coming back from that.
Serving and Storing
This is a right-now kind of dish because reheating never quite brings back the crispness. If you have leftovers, which is rare, you can warm them in a skillet over medium heat to revive some texture. I've also made the filling ahead and kept it in the fridge, then assembled and baked right before guests arrived.
- Set out extra napkins because this gets messy in the best way.
- Double the recipe if you're feeding more than six people because it goes faster than you think.
- Let it cool for about three minutes before serving so no one burns their mouth on molten cheese.
 Pin it
 This recipe taught me that impressive doesn't have to mean complicated, and that sometimes folding cheese into triangles is all it takes to turn a regular Tuesday into something people remember. Make it once and you'll find excuses to make it again.
Recipe FAQs
- → Can I make the quesadilla ring ahead of time?
You can assemble the ring up to 2 hours ahead, cover with plastic wrap, and refrigerate. Brush with butter and bake just before serving for the best crispy texture.
- → What other fillings work well in this appetizer?
Try cooked shredded chicken, seasoned ground beef, chorizo, sautéed mushrooms, or jalapeños. Ensure fillings are cooked and well-drained before adding to prevent soggy quesadillas.
- → How do I prevent the quesadillas from opening during baking?
Press the edges firmly when folding and arrange them tightly overlapping in the ring. The melted cheese will help seal them together as they bake.
- → Can I use different types of cheese?
Absolutely. Pepper Jack adds spice, mozzarella provides extra stretch, or Mexican cheese blend works perfectly. Use cheeses that melt well for best results.
- → What size baking sheet do I need?
A standard 18x13-inch half-sheet pan works perfectly. The ring will be approximately 12-14 inches in diameter when properly arranged.
- → How do I serve this for a crowd?
Place the ring on a large platter with dipping bowls in the center. Guests can easily pull off individual quesadilla triangles and dip them in the accompanying sauces.